

Wednesday, 22 April 2015
{THE ORDINARY MOMENTS 15} Little Ladybug Growing Up
Last week a group of my fellow mummy bloggers were going through the emotional process of finding out where their children would be starting school in September. I am very grateful that I have another year before I stay up until past midnight in hopes of finding out as soon as possible if we got our top school choice. Even though my daughter is not heading off to Reception until September 2016, I still have been thinking alot about how quickly my daughter is growing up.
In February 2013, I went back to work after maternity leave and Little Ladybug started attending day nursery full-time. Dropping her off every morning was very hard and really missed her sweet face during the day. She started out as a Caterpillar. She enjoyed crawling around and learning how to walk and then run.

Thursday, 9 April 2015


Thursday, 2 April 2015

Sunday, 22 March 2015
{THE ORDINARY MOMENTS 15} Being Poorly and Skipping
I can not believe how quickly time flies but I must accept that I am mother of a 3 year old. You are often warned of the "Terrible Twos" but I enjoyed the year Little Ladybug (LL) was 2. My job situation changed and I got to spend more time with her. She was my sweet and helpful little girl. She was very sweet and gave me lots of cuddles while my pregnancy. She loved talking to my "bump". As her vocabulary increased in was enjoyable having conversations with her. I loved she could express what she was thinking about. She had fun baking, learning to use a scooter, and tea parties with Daddy.
Now Little Ladybug is 3 years old. She has learned that she is allowed to say "no", she can choose to not do something and to fake cry. She is still my sweet little girl but also can be very challenging.

Now Little Ladybug is 3 years old. She has learned that she is allowed to say "no", she can choose to not do something and to fake cry. She is still my sweet little girl but also can be very challenging.
Thursday, 19 March 2015

Wednesday, 18 March 2015


Thursday, 12 March 2015

Wednesday, 11 March 2015

Sunday, 8 March 2015
{THE ORDINARY MOMENTS 15} Teddy Bears and Teapots
When Little Ladybug was around 4 months old, I discovered a local music class run by Hillary and Stacey of Hartbeeps. This is the one baby group that I have been loyal to over the last years. It is on Monday mornings so it helps to start the week off active and keeps us from being sad that Mr L (aka Daddy) is back at work. I met a couple of my really good friends at this class and have enjoyed watching our children get older together. When it was time to head back to work after maternity leave, Little Ladybug went to a childminder that I met at Hartbeeps. These days I get to take her every Monday to the "Happy House" session that is designed for toddlers to 4 years old. Little siblings are welcome so now Bumblebee Boy comes too.

Tuesday, 3 March 2015

Sunday, 1 March 2015
{THE ORDINARY MOMENTS 15} #9 Snow Day
On February 3rd, 2015, we woke up to discover it had snowed. Little LadyBug was only a couple months old the last time it snow enough in our part of England to build a snowman.
We decided to have a "snow day" and keep Little LadyBug home from nursery. My husband would have loved to "work from home" but he had a training at work. I think he was very jealous that we got to play in the snow.
 The snow was melting fast but we put on our warm clothes. I put Bumblebee Boy in the sling and we prepared to gather enough snow to make our 1st snowman together. We took all the snow from the area in front of the house and put it in a waggon to transport to the back of the house. We had fun creating "Harry" with his rocks for eyes, nose and mouth. Most of the snow melted by lunchtime but "Harry" took a couple days to slowly melt away. These are the days to remember.


We decided to have a "snow day" and keep Little LadyBug home from nursery. My husband would have loved to "work from home" but he had a training at work. I think he was very jealous that we got to play in the snow.
Tuesday, 24 February 2015
{THE ORDINARY MOMENTS 15} #8
The lovely Katie at Mummy Daddy Me has inspired me to start documenting the "ordinary moments" of my family.
In the last couple months there have been several moments that have been extraordinary. The birth of my Bumblebee Boy on December 9th will be a day that I will never forget. Little Ladybug's 3rd birthday was very special because we were celebrating her birthday but also spending time with the amazing children and adults that came into our lives because of her. Another extraordinary moment was when Bumblebee Boy smiled at me for the first time. I hope I never forget his sweet baby smile and him winking at me.

Since we have new baby in the house, we have spent most of the last couple months at home. The moments at home could be considered ordinary but these are some of my favourite memories. I loved watching as my daughter and son have started to interact and respond to each other.

Saturday, 5 April 2014
LadyBug Home & Designs 1st Retail Stall
I have not posted a new blog post the last couple weeks because I was busy preparing for LadyBug Home & Designs' 1st selling event at a Pamper Night at a local First (Elementary) School in Berkhamsted. I was invited to have a stall by the talented Natasha from Nevie-Pie Cakes. The event was on Thursday, March 28th.
This was a great opportunity to start creating all the hair accessories and earrings that I have been designing in my head for ages. The last 7 months, I have purchased many fun craft items to start creating items for MadeByLadybugHome shop.
The Preparation:
I had many late nights using the hot gun to create some fun new bows and hair accessories. I also spent time organising my ribbon and button collection. My first job was take all the 3/8 ribbon and cut into 3 yard lengths for selling. Most of my ribbon was purchased in 5 yard length so now I have a couple bags of ribbon "scraps" that are perfect in creating new bow designs.
I had a little helper in my preparation for the event. She got chicken pox the week before the event so I had a couple extra days at home with her. My daughter had lots of fun playing with my buttons. Below is my daughter sorting the buttons back in the jars. She decided to empty 4 pre-sorted jars of buttons and mix them up for me. Unfortunately, she did this several times during the preparation week and we are still finding buttons under the dining table.

She was also very helpful putting together the glitter hair slides. She would match all the pieces together and then I would do the gluing. She enjoyed her before bedtime crafting.

The day before the event, Little LadyBug was helping me put the 3/8 ribbon in the basket for display.

The final night before event was very busy. My husband had to get involved in the last minute preparation. The buttons were sorted into glass jars with ribbon details and the 3/8 ribbon was sorted into basket (cutlery tray from Laura Ashley)


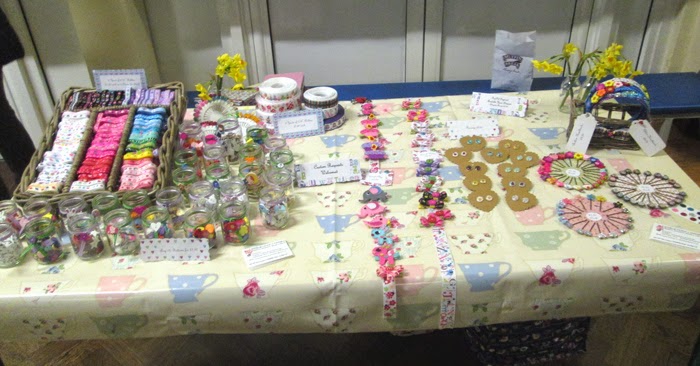
The LadyBug Home & Designs Stall
I was really nervous when I was laying out my stall. My neighbour was the lovely Joanne from The Flint House. We had lots of fun talking and there was an amazing curry dinner available for purchase.

This was a great opportunity to start creating all the hair accessories and earrings that I have been designing in my head for ages. The last 7 months, I have purchased many fun craft items to start creating items for MadeByLadybugHome shop.
The Preparation:
I had many late nights using the hot gun to create some fun new bows and hair accessories. I also spent time organising my ribbon and button collection. My first job was take all the 3/8 ribbon and cut into 3 yard lengths for selling. Most of my ribbon was purchased in 5 yard length so now I have a couple bags of ribbon "scraps" that are perfect in creating new bow designs.
I had a little helper in my preparation for the event. She got chicken pox the week before the event so I had a couple extra days at home with her. My daughter had lots of fun playing with my buttons. Below is my daughter sorting the buttons back in the jars. She decided to empty 4 pre-sorted jars of buttons and mix them up for me. Unfortunately, she did this several times during the preparation week and we are still finding buttons under the dining table.
She was also very helpful putting together the glitter hair slides. She would match all the pieces together and then I would do the gluing. She enjoyed her before bedtime crafting.
The day before the event, Little LadyBug was helping me put the 3/8 ribbon in the basket for display.
The final night before event was very busy. My husband had to get involved in the last minute preparation. The buttons were sorted into glass jars with ribbon details and the 3/8 ribbon was sorted into basket (cutlery tray from Laura Ashley)
This the amazing book that I donated for the raffle. I imported it from the USA because it is not being released until April 10th and I could not wait to look at all the amazing photos and ideas. Just wish that I actually knew how to bake a cake. It will be good for future baking attempts.
The LadyBug Home & Designs Stall
I was really nervous when I was laying out my stall. My neighbour was the lovely Joanne from The Flint House. We had lots of fun talking and there was an amazing curry dinner available for purchase.
I met some really nice buyers and sold some ribbon, hair slides, and hair bows. I am no longer a "Stall Virgin" and will have more confidence for the next stall opportunity.
A highlight of the night was finally getting to meet Marie from Heartfelt Handmade. I have several cherished items that she made in my house. She gave me some words of wisdom before the event and after promoted several of my items on Facebook. It has a been really exciting last week as my "Likes" on Facebook Page has grown from 32 likes to 67. I will post details photos of new items for sale on Facebook and Etsy soon.
Best Wishes,
LadyBug Home & DesignsWednesday, 19 February 2014
Handmade Bear Mask
At the First Mummies Club on February 18th,
Helen Burridge presented the course 'Kids Costumes-The Homespun Living. The activity was to create a felt mask for our
"little one". My first thought was to create a LadyBug mask but
I decided on a ... BEAR.
Little Ladybug loves to create a cave in Mommy's and Daddy's bed by tucking the blankets between the headboard and the wall. Then we read "We're Going on a Bear Hunt" by Michael Rosen and Helen Oxenbury. Little Ladybug loves to yell "BEAR" when it gets to the part in the book when the family finds the bear.
Below is how I created Little Ladybug's bear mask
Mask Shape
1. Put 2 pieces of felt together ( would suggest pinning together to keep felt from slipping) and cut out a mask shape. I decided to create a high forehead to create a more round face for the bear.
2. I cut out the eyes at this time by folding the felt mask in half and cutting circles. (I had to do some trimming of the eye sockets later to even them up before sewing)
Ears
1. Cut out the brown ears. I put two pieces of brown felt together and cut a half-circle shape.
2. Created the inner ear by using the brown ear shape to cut 2 pink ears the same size. I then trimmed down the pink ear by taking approximately 1 cm off the edges of the pink ear. (I used pink because it was for my daughter but a tan or light brown colour is another option.)
3. Sewed the pink ears to the brown ears. I used a blanket stitch on 3 sides but on the edge that will be attached to the mask I used a running stitch. I used a running stitch so that I could then put the stitches and create pleats in the ears.
4. Sewed the ears to the front side of the back mask piece (If you ears are flat, you can also create
shape by creating pleats as you sew the ears to the mask)
Nose
1. I cut a circle out of black felt that was a little larger than the nose shape I wanted to create.
2. Sewed a running stick around the circumference of the circle and then pull string to gather edges together.
3. I put a little piece of felt inside of the nose to help keep its shape.
4. Sewed the nose onto the front side of the front mask piece
Almost Done
1. Sewed the 2 mask pieces together. Sewed around the eye sockets. I chose to pull the stitches tight in the eye holes at a couple points to create a slight gathering on the mask.
2. You can either use elastic or ribbon.
If using elastic, sew 1 end of the elastic between the 2 mask pieces on one side. Then hold up the mask to your little one and measure how much elastic is needed wrap around their head. Sew the elastic between the 2 mask pieces.
I used ribbon and cut pieces of equal lengths of ribbon that will give plenty of length to tie behind
little one's head. I would suggest sealing the ribbon ends by flame or little clear nail polish to prevent fraying. (I chose to use ribbon because it is very possible that my husband and I will be requested to wear the mask.)
I am going to hide this bear mask in Little Ladybug's "We're Going on a Bear Hunt" book and surprise her when we read it tonight.

Little Ladybug wearing mask. We are going on a bear hunt.


Little Ladybug loves to create a cave in Mommy's and Daddy's bed by tucking the blankets between the headboard and the wall. Then we read "We're Going on a Bear Hunt" by Michael Rosen and Helen Oxenbury. Little Ladybug loves to yell "BEAR" when it gets to the part in the book when the family finds the bear.
Below is how I created Little Ladybug's bear mask
Mask Shape
1. Put 2 pieces of felt together ( would suggest pinning together to keep felt from slipping) and cut out a mask shape. I decided to create a high forehead to create a more round face for the bear.
2. I cut out the eyes at this time by folding the felt mask in half and cutting circles. (I had to do some trimming of the eye sockets later to even them up before sewing)
Ears
1. Cut out the brown ears. I put two pieces of brown felt together and cut a half-circle shape.
2. Created the inner ear by using the brown ear shape to cut 2 pink ears the same size. I then trimmed down the pink ear by taking approximately 1 cm off the edges of the pink ear. (I used pink because it was for my daughter but a tan or light brown colour is another option.)
3. Sewed the pink ears to the brown ears. I used a blanket stitch on 3 sides but on the edge that will be attached to the mask I used a running stitch. I used a running stitch so that I could then put the stitches and create pleats in the ears.
4. Sewed the ears to the front side of the back mask piece (If you ears are flat, you can also create
shape by creating pleats as you sew the ears to the mask)
Nose
1. I cut a circle out of black felt that was a little larger than the nose shape I wanted to create.
2. Sewed a running stick around the circumference of the circle and then pull string to gather edges together.
3. I put a little piece of felt inside of the nose to help keep its shape.
4. Sewed the nose onto the front side of the front mask piece
Almost Done
1. Sewed the 2 mask pieces together. Sewed around the eye sockets. I chose to pull the stitches tight in the eye holes at a couple points to create a slight gathering on the mask.
2. You can either use elastic or ribbon.
If using elastic, sew 1 end of the elastic between the 2 mask pieces on one side. Then hold up the mask to your little one and measure how much elastic is needed wrap around their head. Sew the elastic between the 2 mask pieces.
I used ribbon and cut pieces of equal lengths of ribbon that will give plenty of length to tie behind
little one's head. I would suggest sealing the ribbon ends by flame or little clear nail polish to prevent fraying. (I chose to use ribbon because it is very possible that my husband and I will be requested to wear the mask.)
I am going to hide this bear mask in Little Ladybug's "We're Going on a Bear Hunt" book and surprise her when we read it tonight.

Little Ladybug wearing mask. We are going on a bear hunt.
Tuesday, 18 February 2014
First Mummies Club - Feb. 18th
On February 18th, I had a fun evening with the First Mummies Club in Hemel Hempstead. Lisa organised a fun evening with guest speaker Helen Burridge presenting 'Kids Costumes-The Homespun Living Way'. Helen is an extremely talented and inspirational mother whom runs the business Homespun Living in St. Albans.
Helen gave has some very inspiration advice on how to make quick and easy costumes for the upcoming school fancy dress days, book day, and nativity plays that our little ones will be soon taking part in the next couple years in school. My favorite advice was when making capes (superheros, butterfly, or princess) to not put elastic around the neck but to make arm loops instead on each side. She had an amazing suggestion that you could use an old embroider tablecloth as butterfly wings. Cut into a butterwing shape, hem and then add elastic arm and wrist loops.
The activity for the evening was to create felt masks for our "little one". Read Blog on February 19th, 2013 to find out what animal I chose to make for Emma.

Helen is about to go on maternity leave but she has several very interest courses starting in May - June 2014. Booking workshops now.
Helen gave has some very inspiration advice on how to make quick and easy costumes for the upcoming school fancy dress days, book day, and nativity plays that our little ones will be soon taking part in the next couple years in school. My favorite advice was when making capes (superheros, butterfly, or princess) to not put elastic around the neck but to make arm loops instead on each side. She had an amazing suggestion that you could use an old embroider tablecloth as butterfly wings. Cut into a butterwing shape, hem and then add elastic arm and wrist loops.
The activity for the evening was to create felt masks for our "little one". Read Blog on February 19th, 2013 to find out what animal I chose to make for Emma.
Helen is about to go on maternity leave but she has several very interest courses starting in May - June 2014. Booking workshops now.
Wednesday, 8 August 2012
My Baby Girl
With arrival of my beautiful baby girl came being woken in the middle of the night for requests of milk or sometimes just a cuddle. I cherished my sleep in the past but find lots of happiness in the hours spent in the silence of the night with my baby girl. I do have moments of just wishing I could simply ignore her cries or wake my husband and bag him to go make her a bottle of milk but the moment I see her beautiful face these thoughts drift away. I try to cherish the moments when the world around us is quiet and it is just the two of us. The months since her birth have flown by. We still have the special bond that comes with breastfeeding. I know sooner or later for several different reasons we will not have these moments of her feeding. I will miss her loving looks and how she reaches up to touch my face with her soft hands. I know we will have lots of cuddles in the future and I will enjoy her telling me about what she dreams about when she has that peaceful look on her sleeping face. At this moment and time, I am just grateful that I get to spend peaceful time during the early hours of the day with my amazing baby girl.

Subscribe to:
Posts (Atom)
©
LadyBug Home and Designs. All rights reserved.